


This Pink American Flag Art Project Gives Old Glory a Sparkly, Summer Makeover!

Pink American Flags Sing “Summer Love” and “Acceptance”
The American flag has got to be one of the most iconic designs around. Those stars and stripes just seem to shimmy. Plus, the red, white and blue is a favorite color combo for flags around the world!
It’s fun though as artists to take iconic designs and see how we can make them our own by shaking things up a bit.
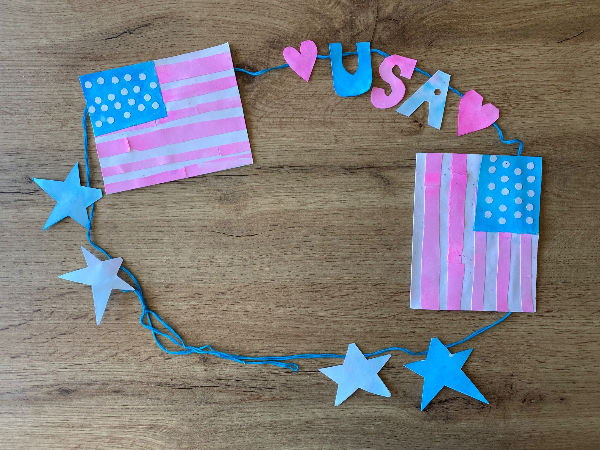
This sparkly, blue and pink American flag banner does just that! The gentle colors sing “summer”. They are also a lovely way to nod to all the women, girls and LGBTQ folks out there who make our country such a fun, happening place to be.
Also, the boys out there need not feel left out. Pink is a gorgeous color that can represent the creativity, love and resilience simmering inside each and every one of us.
Plus, we get to learn all about why making double-sided banners is such a good challenge for kids. I wonder if you’ll notice the silly mistake I made on my own American flag design.
Let’s get started celebrating Old Glory with this sparkly blue and pink American Flag banner!
It’s Time to Embrace PINK
Pink is powerful. It’s a tint of red which is an intense, vibrant color that dominates pretty much every other color. Even black has trouble holding its own next to red’s fire power.
Red is a color that holds its strength on its sleeve. There’s no denying it. Pink on the other hand, holds its strength a little further in. It gives leeway and makes space for others.
Pink mixes beautifully with so many other colors, from yellow to blue, and even green which is its opposite.
To me, pink feels creative and generous. It gets along well with others and always seems to bring a little warmth and joy wherever it goes.
Pink is a color that takes care of its own, while never losing its own special spark.

Let’s Push Red, White and Blue into Summer Vibes
Crayola’s 10-pack of washable markers, Bright Colors, includes 2 delicious pinks:
Hot Pink and Hot Magenta.
It also has some gorgeous tropical blues. All these colors together bring out a summery vibe that’s just perfect for an American flag banner.
After all, summer is the month of Flag Day, Juneteenth, Pride Month and July 4th!
Summer is FULL of reasons to celebrate our past and present with American flag art projects in vivid hues.
If you’re curious about playing with summer color, click below to read why Crayola’s Bright Colors washable marker pack is one of my favorite art supplies for kids’ summer art projects.

Watercoloring with Markers gives our American Flags EXTRA Summer Vibes
One last touch to bring this project deep into the summer months is WATERCOLOR.
Watercolor effects are so juicy and pleasing. They are even yummier when paired with gorgeous, crisp colors like the ones we use in this project.
Watercolor also goes beautifully with the soft colors and sparkles we are using to create our pink American flag banner. All of these techniques and choices come together to create a truly sweet kids art project that you can hang proudly anywhere in your home.

Designing Artwork with 2 Sides is a Great Skill for Kids
One of the best things about this project is encouraging kids to create something double sided.
Creating double-sided art projects is a great skill to develop! Here's why:
It makes kids create a "copy" where they have to do the same design twice. Creating copies is a fantastic way to build observation skills and attention to detail.
It helps kids understand that some art is meant to be viewed "in the round". This means that a viewer can walk all the way around it, seeing it from different angles.
It challenges young artists to think about how artwork reads from both the front AND the reverse.
It encourages a higher level of craftsmanship. When both sides of a project will be seen, kids naturally start paying closer attention to how their work is assembled.
When kids create double-sided projects, an important shift happens. It pulls young artists away from "piece of paper on a table" and into the thrilling experience of art that works in the real, 3D world.
I made a pretty funny mistake when I was designing this project. Let's just say I didn't fully consider what would happen when I made two-sided letters.
Read to the end to see what it was!

How to Make a Sparkly, Pink American Flag Banner
Supplies
2 ½ pieces 8.5” x 11” white card stock
Crayola Broad Tip Markers: Hot Magenta and Battery Charged Blue (included in the Bright Colors pack and Crayola’s Big 40 marker set)
Pencil
Scissors
Hole Puncher
Glue Stick and/ or Glitter Glue
String
Tape of any kind
Marker Watercolor Supplies
Palette for color mixing (a ceramic plate, serving dish, cake pan or piece of aluminum foil would all work. It needs to be non-porous, flat and not too large. White is best.)
Spray bottle
Paper towels or clean rags
Feel free to substitute whatever art supplies you have on hand.
Step-by-Step Instructions for our Pink American Flag Art Project
REMEMBER: We are doing a double-sided project. That means that every piece will have 2 sides to it. Just coloring on the front and the back of the piece of paper won’t work, as we are putting a string throughout the entire banner. I will give details as we go on how to make doubles of each shape.
Step 1: Cut out your pieces.
These are the shapes I made. Feel free to copy or choose your own combinations!
2 flags (Fold 1 piece of paper in half horizontally, then vertically. Cut along the shorter fold. Now you have two pieces of paper that will fold over the line, to make your flag).
4 stars
2 hearts
3 letters, U-S-A (use the hole puncher to make the hole in "A")
For the stars and stripes:
Fold one big piece of paper into fourths, just like with the flag. Then cut along ALL the folds so you have 4 pieces of paper. Cut one of those quarters in half. You will have 5 pieces all together. These pieces DO NOT need to be duplicated so there are 2 sides.
Every shape needs 2 SIDES. To do this, I cut all my shapes along the fold of my paper. That created a folded shape I could wrap over my string. If that’s too annoying to figure out, just fold your paper in half and cut out 2 of every shape. You can color them and glue them together at the end.
Creating folded shapes does make things easier when it’s time to color and close the shapes around the string, but follow your nose!


Step 2: Watercolor your pieces with washable markers.
Completely cover your palette with your Crayola Hot Magenta ink. Spritz water on it under the ink pools nicely. Then firmly press in the hearts, the “S” and 2 of the quarters of paper for the stripes.
You will need to refresh your ink a few times. Make sure to completely rub off any water with a paper towel between ink applications so the ink adheres to the palette


Repeat with the Battery Charged Blue Crayola Marker. Color 2 stars and the “U”. Also, watercolor blue the 2 smaller pieces for the blue section of the flag under the stars.


I didn’t like how the bright white of the “A” and the remaining stars looked among all the beautiful watercolor effects. I decided to give them a bit of color by drawing a few stripes on my palette with each of my markers. Then I gave the palettes a good spritz and pressed in the pieces.


Step 3: Cut out your pink stripes.
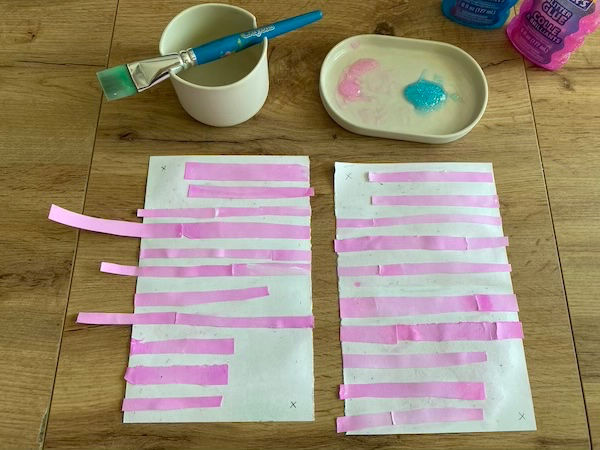
Each piece of pink paper will provide enough stripes to cover 2 sides of a flag. Cut each of those pink pieces into strips. Go as thick or thin as you like, depending on what style you prefer.

Step 4: Hole Punch your “Stars”
Grab whatever scrap white paper you have left and use your hole puncher to punch out a bunch of white circles. I used about 15 per flag, so 60 total (remember, there are 4 flags total once you count both sides!). It’s up to you how many or how few you do!

Step 6: Assemble your flags
Glue on your stripes first, using glitter glue and a big paint brush. I cut my stripes the wrong way and ended up collaging them together.
Glue on the blue section for the stars. REMEMBER, depending on how you cut your flags the blue might not go on the same spot on both sides. Check how your flag will look on each side before gluing.
Glue the "stars" onto the blue sections.
Remember to put all the details on both sides of your flags!


Step 5: Attach your pieces to the string
Lay out all your pieces in the order you like most.
Make sure your string is long enough to fit all the pieces as well as about 10” - 12” on either end. Leaving more string on the ends give your flexibility when it comes time to hang it.
Wrap all of your pieces around the string. Glue all of the pieces on the inside (make sure to get everywhere, including the edges and corners!) and close the pieces


Step 6: Add loops to the ends of your string
This is optional, but I always add loops at the end of my banner strings. This makes it easier to hang later!
Display and Enjoy your Sparkly Pink American Flag!
This American flag art project looks fabulous everywhere! So far I’ve had mine up in my front window and over the dinner table. I’m thinking about trying it in a doorway next.
Since it’s double-sided, you can put it pretty much anywhere!


Did you Find the Mistake in this American Flag Art Project?
It’s kind of hilarious how many mistakes I made on this project.
I got so distracted photographing beautiful watercolor effects, that I ended up cutting my pink stripes the wrong way.
I attached a heart the wrong way to my thread so it’s permanently askew when I hang the banner.
Most hilariously, I failed to consider that letters do not say the same thing from the back as they do from the front.
I realized this when my parents came over for dinner one night.
My pink American creation was hanging jauntily from our dinner chandelier (not as fancy as it sounds). I was feeling pretty proud of it so I said to my parents, “Hey, what do you think of the decorations?”
My mom was sitting next to me and said, “oh yes, it’s beautiful!” My stepdad however was sitting across from us. He just looked at it then said, “I don’t get it.”
It took us all a minute to realize that from his angle, the banner read “A-S-U”.
Which to him naturally meant, Arizona State University. He thought I had made a randomly patriotic, nonsensical banner celebrating his alma mater!
Hooray, ASU!
It was a mistake but it was perfect. Without intending to, I had made a banner celebrating an important place in my stepdad’s life. I also got to witness him in a moment of utter bemusement. My oopsie ended up causing such a charming, hilarious moment for my family around the dinner table.
Obviously this is a mistake that would be easy to fix the next time we design a double-sided banner. Can you think of what changes we could make?
Or maybe don't change a thing! This is after all what the great Bob Ross would call, "a happy accident".


Comments