
Kids Decorate the Lemonade Bar with This Easy Summer Art Project!
- Jun 12
- 7 min read

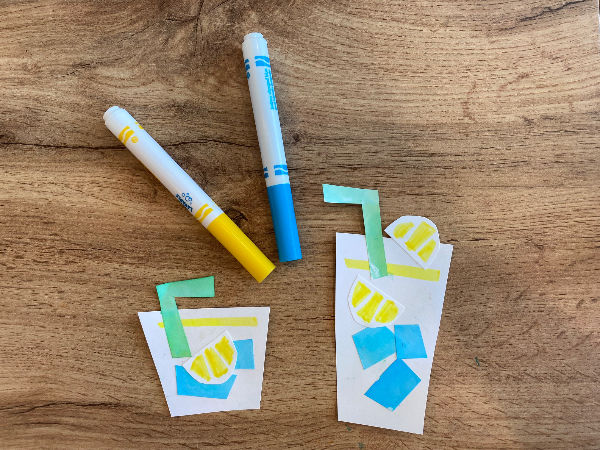
Adorable Lemonade Bar Decorations that Kids Can Make!
Whether you’re celebrating July 4th or simply hosting friends for a BBQ dinner, every summer party needs a lemonade bar.
But we don't want to leave kids out of the party prep! With just a few basic shapes and 2 washable markers, kids can create this adorable lemonade art project to make the drinks table even more inviting.
Best of all, these lemonade bar decorations are lightweight, inexpensive and easy to store away for future summer parties. You can even tweak the colors and shapes for different drinks and themes. Pink lemonade? Tropical punch? Root beer floats? Go for it!
Let’s get squeezing on this easy summer art project for kids!

Micro Palettes: The Secret to Great-Looking Lemonade Bar Decorations
One reason we hesitate to let young kids make party decorations is simple: we're not always sure how they'll turn out!
I love my kids' creativity, but I don't necessarily want a carefully planned buffet covered in muddy-colored artwork.
That's where micro palettes come in.
A micro palette uses just 1–3 colors in a project. Our lemonade bar decorations use only blue and yellow. Since these colors mix beautifully together, the finished artwork stays bright and cheerful even if kids color outside the lines.
Micro palettes aren't just great for decorations. They're also a powerful learning tool. By limiting the number of colors, kids have fewer decisions to manage and can focus on understanding how their choices affect the final artwork.
So choose 2–3 colors that work well together, hand them to your kids, and let them go to town!

Let's Use Refreshing Marker Colors for Our Lemonade Art Project
The markers I used for this project come from the Crayola Bright Colors box, one of the best kids’ marker sets for summer art projects.
For this design, we use Laser Lemon for the lemons and Battery Charged Blue for the ice. These aren't just ordinary yellow and blue- they're bright, tropical hues that give the whole project a fresh, summery feel.
Even better, when these colors mix together they create a vibrant green that fits perfectly with the lemonade theme.
Working with specific hues like these helps kids discover that there are entire worlds hidden inside simple color names like "yellow" and "blue."
If you want to read more about why Crayola's Bright Colors marker pack is the ultimate summer art supply, click below.

Kids Practice Basic Shapes with Trapezoids and Semi Circles
Art is all about understanding shape language.
Everything in the 3D world has an underlying structure. As we build our visual literacy, we start to notice that a lemon slice is a semi circle. Also, we can use trapezoids to represent drink glasses and ice cubes!
Using the same shape for multiple elements creates visual continuity throughout the project. Using a micro palette has the same effect.
When kids learn to translate complex objects like a glass filled with ice into a handful of simple shapes, they're exploring geometry, abstraction and shape language all at once.
The Paper Kickstand: A Vintage Trick for Displaying Artwork
One thing kids rarely get to explore in art class is how artwork is actually displayed in the real world. But display and presentation are a HUGE part of art and design.
Our lemonade bar decorations are the perfect chance to experiment with a classic technique: the paper kickstand.
A kickstand is simply a folded piece of paper attached to the back of an artwork to help it stand upright. Sounds simple… but it’s surprisingly tricky!
The kickstand has to be the right size, shape and angle to support our lemonade art project without tipping over. Too far forward and the piece falls flat. Too far back and it topples backwards.
Testing and adjusting kickstands is a fantastic way for kids to explore design, engineering and problem solving in a hands-on way.
Best of all, paper kickstands don’t require any extra supplies. Just paper, scissors and glue!

HOW TO MAKE Lemonade Bar Decorations
Supplies
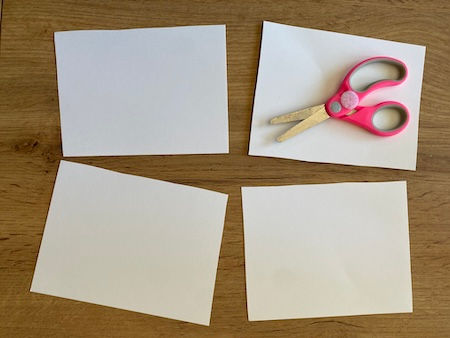
1 piece of 8.5x11 white card stock
Crayola washable, broad tip markers Laser Lemon and Battery Charged Blue (both included in Crayola’s Bright Colors pack or Crayola's Big 40 marker set)
Scissors
Glue (I used a glue stick but glitter glue, bottle glue or even tape would all work just fine)
Marker Watercolor Supplies
Palette for color mixing (a ceramic plate, serving dish, cake pan or piece of aluminum foil would all work. It needs to be non-porous, flat and not too large. White is best.)
Spray bottle
Paper towels or clean rags
Step-by-Step Guide for Making our Lemonade Bar Decorations
Step 1: Cut your pieces out
2 larger trapezoids for the glasses. Make the larger one about as tall as your hand.
4-6 smaller trapezoids for ice. These need to be small enough to fit into the palette for coloring.
2-4 semicircles for lemons. Cut out 1-2 circles, then cut them in half again.
2 L shapes for straws. These also need to be small enough to fit into your palette.
Leave some extra paper for the kickstands later.
As you cut, test out all the shapes on the larger trapezoids. Make sure they are all good sizes to look like drink glasses with ice and lemon slices.
To avoid wasting paper, try cutting your big piece of paper into 4ths. Then see how many shapes you can get out of each fourth.


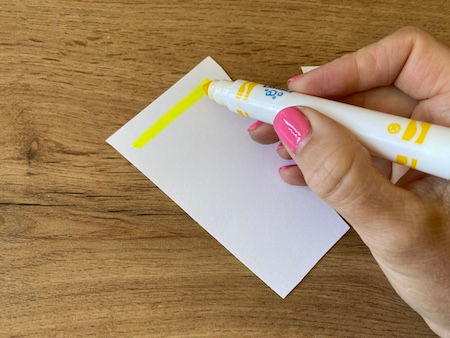
Step 2: Color your lemons and drink.
Time to break out our Laser Lemon Crayola markers.
Draw a yellow line near the top of the drink glasses to represent the top of the lemonade.
Draw triangles within the semicircles so they look like lemon slices. Don't worry about being perfectly realistic. Simple shapes are part of what makes this project charming!


Step 3:Watercolor your ice cubes and straws.
Ice Cubes: cover your whole palette in Battery Charged Blue Crayola marker ink. Give it a few spritzes of water so the ink starts to pool and run. Make sure not to add too much water, or your colors will look faded. Press in your ice cubes, face down. Let them absorb water for about 5 seconds. Repeat as needed.
Straws: cover your palette half in Battery Charged Blue and half in Laser Lemon Crayola marker ink. Spritz the palette with water. Then tilt the palette around to let the colors mix. When you’re ready, press the straw shapes down like you did with the ice cubes.
Make sure to totally clean and dry your palette with a paper towel between colors. If the palette is wet, it will be hard to get your colors to stick.


Step 4: Attach all your pieces with glue
First arrange all your pieces on top of the drink glasses. I like putting the ice on the bottom and the lemon slices floating on top, but you can do whatever you like!
Glue everything down
If you’d like to seal your artwork so it’s slightly water resistant and lasts longer, you can brush a layer of glue all over the glasses of lemonade.


Step 5: Make the kickstands
This might be the trickiest part of our lemonade art project. Just be patient with yourself and keep tinkering until you get it right!
Cut out a piece of paper for each glass of lemonade.
Make it as WIDE as the glass, and at least ½ as TALL as the glass. If the kickstand is too small, it won’t be able to support the weight of the lemonade. Remember, the lemonade glass has glue and multiple pieces of paper on it. It will be heavier than a simple piece of paper.
Line up the bottom of your kickstand with the bottom of your lemonade glass. Make sure they are both flat across.
Fold the kickstand paper into thirds. Make sure your crease is very tight, by running your fingernail or the side of a marker along it.
Glue the middle third of the kickstand to the middle of the lemonade glass. MAKE SURE THE BOTTOMS ARE LINED UP!
Pull out the flaps of your kickstand and see how the lemonade stands up!
Trouble shooting:
If the lemonade glass falls forward, cut a very small triangle off the bottom of each flap. Do a little bit at a time, and test it out after each cut. Check out the pictures below for reference.


Now Make Your Own Summer Art Projects!
Now that you've made these lemonade bar decorations, try designing your own summer refreshments! Maybe it's pink lemonade, root beer floats, tropical punch or an original creation from your imagination. The techniques are exactly the same. Simply swap out some of the variables.
Variables You Can Change
Colors
Drink type
Shapes
Size
Display method
Number of decorations
Being a powerful creative isn’t about becoming a better copy machine. It’s about bringing your own perspective and skills to the wider world.
Once kids have completed this Lemonade Summer Party Decoration, they can make their own original design! All they have to do is tinker with the variables within the project.

If you liked this Lemonade Art Project, you might also like:
FAQs for this Lemonade Art Project
What age is this lemonade art project best for?
This project works well for preschoolers, elementary-aged kids and even older children. Younger artists may need help cutting shapes, while older kids can design their own lemonade-inspired decorations.
What supplies do I need for these lemonade bar decorations?
You'll need cardstock, washable markers, scissors, glue and a few simple marker watercolor supplies such as a spray bottle and mixing palette.
Can I make this project without marker watercolors?
Absolutely! Kids can simply color the shapes with markers and assemble the decorations without adding any watercolor effects.
How can kids customize their lemonade decorations?
Try changing the colors, shapes, drink themes or display method. Kids can create pink lemonade, tropical punch, iced tea or even root beer float decorations.
What is a micro palette?
A micro palette is a limited group of 1–3 colors used within a project. Limiting colors helps artwork look cohesive while teaching kids important color theory concepts.
Can these decorations be reused?
Yes! Because they're made from cardstock, they can be stored and reused for future summer parties, lemonade stands and family celebrations.


Comments