
Let’s Explore Flowers with this Peach Blossom Art Project for Kids
- Jun 11
- 10 min read
Updated: Jun 12

Water + Markers = Peach Blossom Art Project!
Is there any better way to celebrate summer than to dive into a flower art project?!
Not only are we creating fruit and flowers. This adorable set of peachy creations turns into bouquet pins that you can tuck into your favorite summer flowers.
We will be using Crayola’s Bright Markers washable markers to achieve yummy watercolor effects. Isn't it amazing how with just a few art supplies, kids can make such fun summer art projects?
To keep things simple, we'll use a micro palette of just two colors: pink and orange.
Together they create the soft, delicate colors we see in peach blossoms and ripe summer peaches.
Let's get started!

Flowers Help Kids Fall in Love with Nature & Creativity
Flowers are magical for kids.
They are one of the first ways we learn to transform our environment. Dandelions arranged in a cup. Daisies woven into crowns.
Flowers teach kids to look closely. Maybe they will find a ladybug stumbling through petals, or ants scurrying along a stem.
Flowers also teach kids how much visual variety we can find in the world. Leaves that are lobed, tear drop shaped, prickly and smooth. Colors come in every shade, temperature, and translucency.
Flowers teach us some of the first and most inspiring creative lessons that we will ever learn.
They are wonderful objects to surround our children with, for a hundred different reasons.

Watercoloring with Markers is Perfect for Kids’ Flower Art
Using markers to watercolor is great anytime, but when I’m coloring flowers it’s especially fun.
Watercolor is a highly translucent art supply. This makes it perfect for capturing the translucent quality of flower petals.
Watercolor also keeps colors quite gentle. They bleed easily into one another, creating beautiful gradients. This reminds me so much of the gorgeous color changes in blooms of all seasons, from dahlias to tulips.
Learning how to watercolor flowers using paint is quite challenging. Children have to figure out how much water to add to a paint pan to make it wet but not too wet. How to use a paintbrush, how to mix the paint colors… it’s a lot to master all at once!
That’s why I love easing kids (and adults for that matter) into watercolor by using washable markers. The learning gets simplified and kids can still have a lot of success creating beautiful watercolor effects.
Plus, it’s a lot of fun! Kids love going to town with those squirt bottles.

What Marker Colors Should we use to Make our Peach Blossoms?
Since flowers come in so many wonderful colors, it can feel a little daunting to figure out which hues to use.
Enter the micro palettes. That’s the phrase I use for collections of 1-3 colors that we use in a single project. Micro palettes are wonderful for all sorts of art projects for artists of all ages.
I decided to use a micro palette of orange and pink for our Peach Blossom Art Project.
Like all the other pieces in my collection of summer art projects, I used Crayola’s Bright Colors Washable Markers 10-pack. This pack has a bright, vivid orange called Orange Circuit.
It also has 2 pinks though. I had some decision making to do!
I make some palette swatches with each of the pinks. Hot Magenta is a strong color. I know from other projects that it stays nice and bold even when mixed with water.
Hot Pink is a more gentle color. When mixed with water it can become very light. It also becomes overwhelmed by other colors easily. I would have to be careful with my ratios when mixing it.
For this project I decided to take a chance and go with Hot Pink. I thought it best represented the delicate nature of peach blossoms and skin. Fingers crossed!

Displaying our Flower Art Project
How to display work is a major problem that artists are always busily solving.
Each of the projects in my collection of summer art projects features a different display method. This peach blossom project teaches kids how to make bouquet pins to add texture and interest to summer flower arrangements.
If you don’t have flowers of course, the artwork can become a bouquet all on its own! Also, kids can instead turn this peachy project into a banner, a magnet set, a necklace or even decorations for the mantle.
Let’s get started making our watercolor flower project!

HOW TO MAKE Watercolor Peach Blossom Bouquet Pins
Supplies for our watercolor flower project
1 piece of white 8.5” x 11” card stock
Scrap card stock for color testing
Scissors
1 single-use straw
3 tall wooden skewers
Tape (scotch or shipping)
Glue stick
Hole Puncher
Crayola washable, broad tip markers Orange Circuit and Hot Pink
(both included in Crayola’s Bright Colors pack or Big 40 box)
Pencil for younger kids
Marker Watercolor Supplies
Palette for color mixing (a ceramic plate, serving dish, cake pan or piece of aluminum foil would all work. It needs to be non-porous, flat and not too large. White is best.)
Spray bottle
Paper towels or clean rags
Step-by-Step Peach Blossom Instructions
Step 1: Cut Paper into 4ths.
The easiest way to do this is to fold it in half once. Then open it back up again and fold in half the other way. Next, open up the paper and cut it along the folds.
Helping Younger Artists:
Cut projects like this are great because exactness doesn’t matter. If kids’ folds or cuts are wonky, just roll with it!
Step 2: Cut 3 of the pieces of paper into circles.
I like to stack up 2 pieces of paper and cut them at the same time. This is optional, but also a good way for kids to practice efficiency.
However you cut the circle, make sure they fit into whatever palette you will be creating your watercolors in.
Helping Younger Artists:
Have younger kids draw their circles in pencil first and then cut them out. You can draw and or cut out the circle for very young kids.

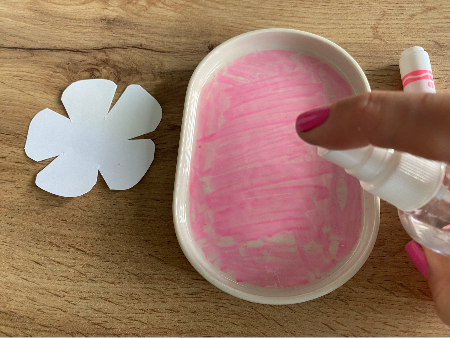
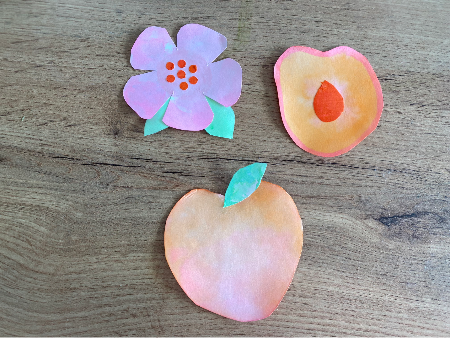
Step 3: Cut 1 of the circles into the shape of a peach blossom.
To do this, you just snip 5 triangles out along the outside of the circle. Try to keep them evenly spaced, and make sure they all stop about ½ inch from the center of the circle.
You can then round out the edges of the petal if you like.
Helping Younger Artists:
Draw triangles for younger kids to cut out. Also, while a peach blossom has 5 petals, you can do 6 petals instead. Even numbers are easier to space out than odd numbers. You can just divide the circle into 6th with 3 lines drawn from one side to the other.


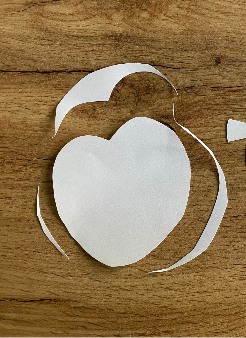
Step 4: Cut your other 2 circles into peach shapes.
This is a great time to stack pieces of paper up and cut out together.
Making peach shapes is fun! You can cut the bottom into a gentle point. Then cut out a curvy triangle on the top, sort of like a wide heart. Feel free to lightly draw your shape first with pencil if that’s helpful.
Make sure the peaches fit into your palette.
Step 5: Watercolor your Peach Blossom
This is the fun part! Cover your palette with your hot pink marker. Make sure to use the BROAD SIDE of the marker tip, not the tiny top of the tip. This will make coloring faster and keep your hues bold and bright.Spritz your color with a few sprays of water. You want the ink to run freely and pool when you tilt the palette. Try out your ink to water ratios a few times on a scrap piece of paper if you need to.
Press the blossom into the color. Press the whole thing evenly and let it absorb the color for about 5 seconds. Don’t leave it in too long or your paper might start to fall apart.
Check your color. If you are happy with it, let the blossom dry! If it’s spotty, wipe your palette off with a dry paper towel and repeat the process.
Helping Younger Artists:
There are 2 reasons why younger kids sometimes get watery colors. 1) They don’t put enough ink on the palette and 2) they spray on too much water. Help them fill in all the gaps on their palette with ink. Also, tell them a number of sprays to do. “Spray 5 pumps”. Then they can add 1 more at a time until it’s ready.


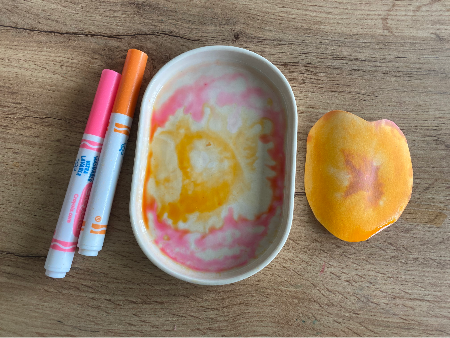
Step 6: Watercolor the closed peach
This peach will be the whole peach. I decided to do a gradation from pink to orange for mine. Check out pictures of peaches online to decide how you want to apply your color.
For a color gradation like me, color the top of the palette pink and the bottom orange.
Make sure the entire palette is colored. When the 2 colors meet, you can blend them together a bit if you like.
Add water, and press!


Step 7: Watercolor the open peach
This peach is open with the pit exposed. Instead of a gradation, we will do 3 nesting circles.
The center is pink, the middle is orange, and the largest is pink.
Make the orange circle a little smaller than the peach cut out. That way, the pink will be on the edge and look like the skin.
Helping Younger Artists:
The nesting circles is actually fairly complicated for younger artists. If they don’t seem up to it, just have them do whatever color combination or pattern they like. It will still look peachy!

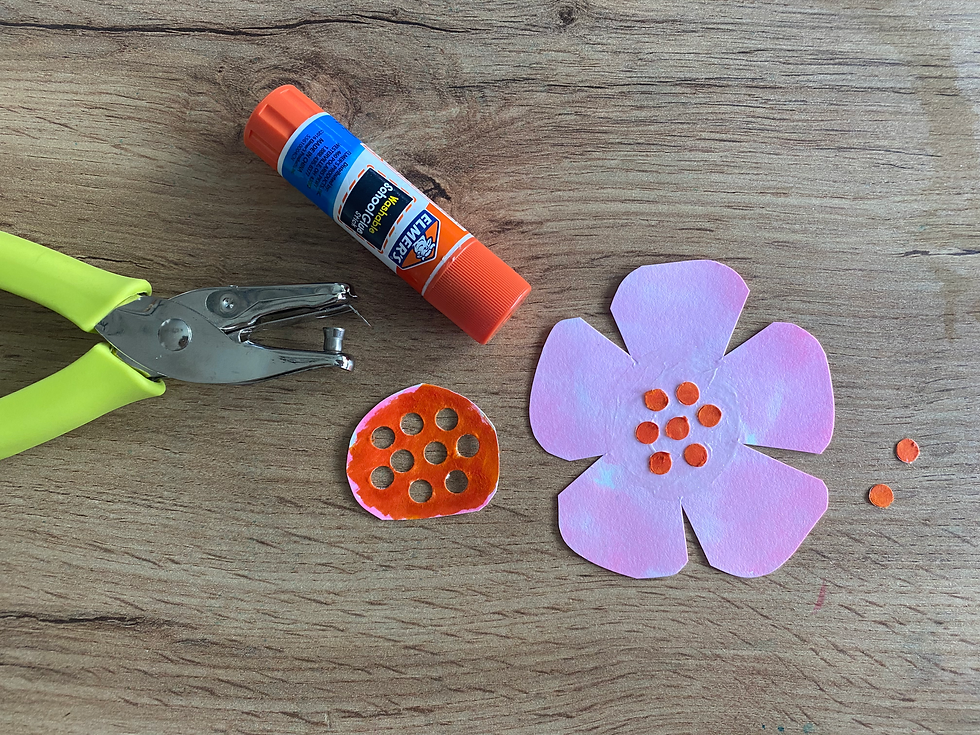
Step 8: Color paper for your flower center and peach pit
This is where kids can see the power of value in a micro palette.
Take a scrap of paper (about as big as 3 fingers together) and color it completely with the hot pink marker. Then, color over that with the orange circuit marker.
Isn’t it amazing how much darker the direct color is than the watercolor marker!
Helping Younger Artists: Coloring a small scrap of paper that’s cut out is a challenge. The paper often folds and slips with the marker. Draw a box on the black fourth of card stock and have them layer their colors in there. Then you or they can cut it out for hole punching.

>>NOTE: Make sure your peach blossom and peaches are dry before proceeding!
Step 9: Cut out/ hole punch your flower center and peach pit
Time to have fun with a hole puncher! Go ahead and punch about 4-8 hole punches. Glue them to the middle of your peach blossom. Have fun playing with patterns before gluing them down.
For the peach pit, you can cut out a circle, then trim the top and bottom into points. Glue the pit into peach #2.

Step 10: Draw the skin of the open peach
Take your pink marker and draw a line around the outside of the open peach to create the “skin”

Step 11: Create green leaves
Use Electric Lime green from your Crayola Bright Colors marker set to watercolor a few piece of paper green. Once they’re dry, cut these into leaf shapes and attach to your blossom and peaches.


Step 12: Attach the straw tubes to back of peaches and blossom
Clip your straw into 3 pieces.
Place a short piece of tape on one side of each straw. Then press the sides down and pinch them together. One side of the straw should be sealed off.
Helping Younger Artists:If this seems too difficult, kids can just tape the skewers onto their peaches and blossoms. The straws are a great way for older kids to learn about modularity, creating art with function and mixing and matching in the future.
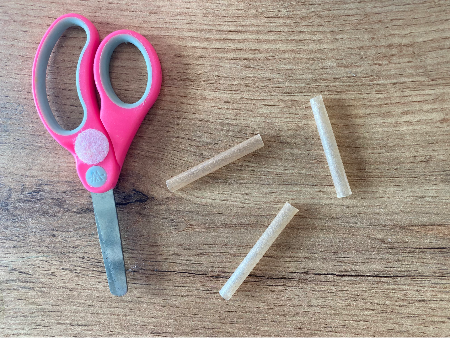


Step 13: Break skewers so they are 3 different lengths
This is optional, but I really like to have the skewers be 3 different lengths. In floral design, having height variety is a helpful way to create exciting bouquets.
I just snap the skewers to the desired height, depending on how tall my vase and the flowers in the bouquet are.

Step 14: Put your peach blossom and peaches in the bouquet!
Have fun mixing and matching what goes where!
Find a place of honor in your house for the summer bouquet and enjoy how cute it looks in your home.
Helping Younger ArtistsMy kids love putting their bouquets in their bedroom.

Kids, now it’s Your Turn to Make an Original Summer Flower Art Project!
The whole point of making art projects isn’t to just copy what other people have done. We’re human beings, not copy machines!
And what are humans excellent at?
Original creative thinking.
This peach blossom art project is a great way to explore lots of important art skills and concepts. Selecting colors, using value as a design tool and watercoloring with markers, just to name a few.
Now that you have an idea of how to use those skills, go design your own summer flower art project!


If you Loved this Marker Watercolor Art Project for Kids, you Might Also Like:
FAQ for this Peach Blossom Flower Project for Kids
What age is this peach blossom art project best for?
This flower art project works well for ages 5 and up. Younger children may need help with cutting and assembly, while older kids can complete most steps independently.
Can I use regular markers instead of Crayola Bright Colors markers?
Yes! Any washable marker should work. Different marker brands may produce slightly different watercolor effects and color intensity.
Do I need watercolor paints for this project?
No. This project creates watercolor effects using washable markers, water, and a non-porous palette.
Can kids make different flowers instead of peach blossoms?
Absolutely! Once kids understand the basic technique, they can design their own flowers using different petal shapes and color combinations.
What are micro palettes?
Micro palettes are small color collections of one to three colors used in a single project. They simplify decision-making while creating strong visual impact.
How can we display the finished artwork?
The finished flowers and peaches can be used as bouquet pins, arranged into paper bouquets, turned into banners, magnets, seasonal decorations, or displayed in a vase with real flowers.


Comments