
Let’s Make a Watercolor Bookmark with Tissue Paper!
- May 12
- 5 min read
Updated: May 18

Create beautiful watercolor effects with Tissue Paper
Ever wanted to do a tissue paper bleed art project, only to discover that your tissue paper doesn’t actually bleed?
Good news! You can still make a beautiful tissue paper watercolor bookmark using just washable markers and a little water.
Whenever I send new art kits out to my students, I make sure to wrap each art supply in brightly colored tissue paper. I do this so my students feel special and excited when they open the box, but I also have an ulterior, artsy motive:
To furnish them with a sneak attack art supply!
BWAHAHAHAHA!!!!
Since I’m wrapping valuable goods in this cutely colored paper, I make sure to use a tissue paper that does NOT bleed. I still wanted my students to be able to watercolor with their tissue paper though, so we use this method! It’s easy and fairly clean watercolor technique for kids!
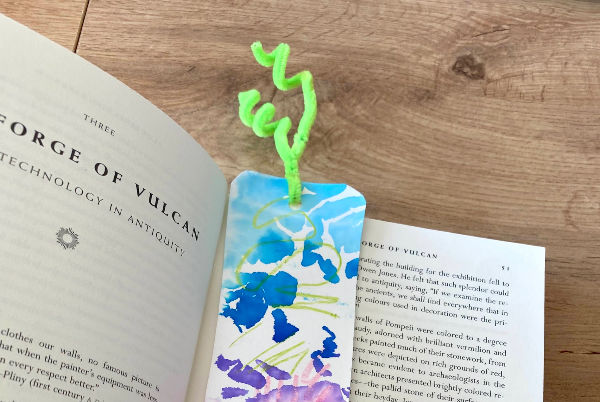
I also made a fringed version of this project, so be sure to check out my Cowgirl Fringe Bookmark to see how one small change can create a completely different design.
Let’s get going!

Learning Outcomes for This Tissue Paper Watercolor Bookmark
This watercolor bookmark craft offers artists of all ages the chance to practice a surprising number of creative skills:
Working with water
Combining different art materials in unexpected ways
Mixing and layering colors
Planning compositions
Evaluating and revising artwork
Punching holes with a hole punch or scissors
Twisting chenille stems
Adding decorative embellishments
That’s a lotta learning!
I find that even as a veteran artist, this kids’ art project flexes my skills. It also inspires lots of other watercolor bookmark ideas!

Supplies for Your Tissue Paper Watercolor Bookmark
White cardstock (best option)
SUBSTITUTE: White construction paper or printer paper. You might want to brush glue on it at the end of your project to make it more durable.
Non-bleeding tissue paper
Crayola Ultra-Clean Washable Markers (2-4 colors that mix well together)
Spray bottle with water
Paper towels
Scissors
Hole punch (optional)
Chenille stem (the art supply formerly known as “pipe cleaner”)
SUBSTITUTE: Ribbon, yarn, or string as alternatives
Small trash bowl or container for wet tissue paper
PROJECT INSTRUCTIONS:
How to Make our Tissue Paper Watercolor Bookmark
Step 1: Gather Your Supplies
Set everything out before you begin. Make sure your spray bottle is filled and your cleanup container is nearby.
Step 2: Cut or Tear the Tissue Paper
Tear the tissue paper into small pieces of different shapes and sizes. It should be enough to evenly cover about 1/4 of your 8.5" x 11" paper

Step 3: Choose Your Marker Colors
Pick several marker colors that will blend nicely together. Colors that sit near each other on the color wheel are usually a safe bet.
Step 4: Apply Marker to one side of the Tissue Paper
Use your markers to draw on one side of each tissue paper piece. Make polka dots, stripes, zigzags, or solid areas of color.
The more marker ink you add, the richer your watercolor effect will be.

Step 5: Arrange the Tissue Paper
Place the colored tissue paper pieces face down on your bookmark in a pleasing arrangement.

Step 7: Mist with Water
Lightly spray the back of the tissue paper until it is damp but not dripping.
Wait about 10 seconds.
Helping Younger Artists
Little artists often want to use lots and lots of water. Encourage them to spray gently. Too much water can make the paper soggy and tear.

Step 8: Remove the Tissue Paper
Carefully lift off the wet tissue paper and place it in your trash container.


Step 9: Evaluate and Add More Color
Take a good look at your bookmark.
Would you like to add more colors? Fill in a blank area? Layer another shape?
If so, repeat the process with fresh pieces of tissue paper.
Step 10: Let It Dry
Take a snack break while your tissue paper watercolor bookmark dries.
If you used only a little water, it should dry quite quickly. Give it more time if you went to town with the spritzing.
Finishing Your Handmade Watercolor Bookmark
Step 11: Cut out your Bookmark
Cut out about 1/4 or 1/3 of your paper. Judge how wide or thin you want it, and also pay attention to where the colors end on either side.

Step 12: Punch a Hole in the Top
Punch a hole near the top of the bookmark. Make sure it isn’t too close to the top of the bookmark, or your tassel will rip out with use.

Step 13: Add the Tassel
Thread your chenille stem, ribbon, or yarn through the hole.

Step 14: Decorate the Topper
Twist the chenille stem into curls, loops, or silly shapes.

Step 15: Sign Your Artwork
Write your name and the year on the back.
If you’re giving your bookmark as a gift, add a sweet note!
Admire your Watercolor Bookmark
Great work creating your very own tissue paper watercolor bookmark. It was so fun creating together!
Now that you know this new technique it’s time to apply some original thinking and…

Come up with More Tissue Paper Watercolor Ideas!
The best thing about doing new art projects is that we get the skills and inspiration to make art projects our own design. It allows us to become TRULY CREATIVE!
Here are just a few ideas to get your juices flowing:
Make cards for an upcoming holiday or birthday
Create some gift tags
Do watercolor experiments in your sketchbook
More watercolor bookmarks in other shapes
Can you do full illustrations of simple things like fruit using this watercolor technique?
Whoa that last idea sounds kinda challenging but if I know you, you can do it! You are such a strong and powerful creative.
Thanks for joining me to make this watercolor bookmark from tissue paper. I can’t wait to see what you create next!

If you liked this Tissue Paper Art Project, you make also enjoy:
Or just browse all my Tissue Paper Art Projects for Kids!
Frequently Asked Questions About Tissue Paper Watercolor Bookmarks
What is a tissue paper watercolor bookmark?
A tissue paper watercolor bookmark is a handmade bookmark created by coloring tissue paper with washable markers, adding water, and transferring the color onto paper.
Can I use regular tissue paper?
Yes! This project works especially well with non-bleeding tissue paper because you create the color yourself using markers.
What paper works best for watercolor bookmarks?
Cardstock works best because it is sturdy and can handle water without tearing.
Can kids make this bookmark craft?
Absolutely. This is an excellent bookmark craft for kids, especially with adult help for spraying water and punching holes.
What can I use instead of a chenille stem?
Ribbon, yarn, embroidery floss, or string all make wonderful bookmark toppers.
Can I make greeting cards using this technique?
Yes! This tissue paper watercolor technique is perfect for cards, gift tags, and all kinds of creative paper projects.


Comments