
DIY Windsock Craft For Kids (weird name... beautiful project)
- May 18
- 7 min read

This Windsock Craft for Kids has All the Artsy Goodness!
Okay, let’s get this out of the way.
“Windsock” is a weird name. To me, it rings of gas stations and stinky feet.
I promise you though, despite its odd title, this art project is absolutely GLORIOUS.
Young artists get to dive into vibrant limited palettes, working with tissue paper, playing with hole punchers, lacing, glitter, display techniques and more.
Best of all? This tissue paper project gets kids playing with the WIND.
This is visual arts at its finest, folks.
Not only is this Tissue Paper Windsock one of the most charming art projects I have ever done, it is PACKED with learning.
Just FYI, we will make 3 windsocks, so get ready for a seriously delightful display.
Let's get started!

There are OODLES of Art Skills in this Windsock Craft
First, let’s dive into all the amazing learning kids can squeeze out of this simple art project.
Children explore:
Creative Color Techniques
Scissor Skills
Using Adhesives (you can use tape or glue)
Paper folding
Air as an Art Supply
Displaying Artwork
Also, I’ve added a lacing component to our windsock art project for older kids with more advanced skills. These include:
Hole punching
Lacing
Tying knots
That’s a lotta learning for such a whimsical, tissue paper art project!

This Windsock Craft for Kids Can Be as Clean or Messy as You Like
If you’re really hankering for a clean art project, have no fear. This tissue paper art project can easily become virtually mess-free.
To cut down on mess, simply:
Use tape instead of glue
Use “clean” coloring supplies like crayons, colored pencils or markers instead of paint sticks.
For anyone who would rather skip coloring altogether, use tissue paper and tape to collage the cuff instead.
I’ll make sure to note in the directions where you can opt for a cleaner option.
Supplies for our Windsock Craft
We will be using a limited palette for this project. That’s how we get such vibrant, eye-happy colors!
Make sure that all coloring supplies and colored materials are in these colors:
Blue
Green
yellow
(white)
*Note: this procect makes 3 windsocks.
To make this tissue paper windsock art project you will need:
1 piece of white 8.5x11 card stock paper
White Crayon
Coloring Supplies in our limited palette colors (I used the blue, green and yellow paint sticks from a 6 pack of Ooly neon chunkies.)
Tissue paper in our limited palette colors
Tape (packing or scotch tape work great)
Scissors
Yarn, ribbon or string in our limited palette colors
A damp paper towel
A pencil
Optional:
For the lacing effect
Hole puncher
More yarn, ribbon or string in our limited palette colors
Other embellishments. We used glitter glue and pulled some pieces out of our Lil Bits Scrap Jar.


PROJECT INSTRUCTIONS
How to Make Our Sea Foam Windsock Craft
This is a great project to either keep simple or go all out! Younger children can make a beautiful windsock using tape and basic coloring. Older kids can add gradients, lacing, and decorative details. I’ve made notes at steps where you can make adjustments to:
Make the project cleaner
Make adjustments for younger children
Step 1: Gather Your Colors
This project uses analogous colors (colors that sit next to each other on the color wheel) to create a peaceful, ocean-inspired effect.
This is the moment when we make sure that only colors in our limited palette are available.
Place out:
Blue, green, and yellow coloring supplies
Blue and green tissue paper
Blue, green, yellow, or white yarn or ribbon
If you’re using white cotton ribbon or string, kids can even color it with markers!
Pro tip: Put all other colors away so kids aren’t tempted to add red or purple halfway through and muddy the palette.

Step 2: Draw Patterns with White Crayon
Using a white crayon, draw patterns, shapes, swirls, or anything you like on your cardstock.
Because the crayon is white, the drawing will be nearly invisible! The magic happens when color is added on top and the hidden design begins to appear.
This is a wonderful step for very young children.
Step 3: Add Color
Color your paper using your limited palette.
For older kids, make a blended gradient:
Add blue at the top.
Add green in the middle.
Add yellow at the bottom.
Blend the sections by layering blue into green and green into yellow.
For younger kids:
Simply encourage them to “go to town” using blue, green, and yellow.
These colors naturally mix beautifully, so the results will look harmonious even without careful blending.
If using Ooly Chunkies paint sticks, use a damp paper towel to gently rub paint off the white crayon areas so the hidden drawing pops.
For a Clean Art Project
Instead of coloring, collage scraps of tissue paper or colored paper onto the cardstock using tape.


Step 4: Let the Artwork Dry
If you used paint sticks or wet media, allow the paper to dry for a few minutes before moving on.
“Dry Time” is an important concept for kids of all ages to learn about.

Step 5: Cut the Windsock Cuffs
Fold your decorated cardstock into thirds lengthwise.
Cut along the folds to create three strips, each approximately:
11 inches long
2½ inches wide
These strips will become your windsock cuffs.
Optional: Use decorative scissors or cut zigzags, curves, or fringe along the edges.
For younger kids:
Draw bold cutting lines on the back of the paper to make cutting easier. Visual estimation is a challenging skill it takes kids time to work up to.


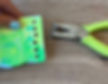
Step 6: Punch Holes in the Cuff (Optional)
If you want to add lacing, overlap the short ends of the strip and punch 3–6 holes through both layers at once.
Make sure:
The holes are evenly spaced
They are far enough apart to prevent tearing
Save the tiny punched circles to add on later as embellishments!
If you’re skipping the lacing, move on to the next step.


Step 7: Cut Tissue Paper to Size
Choose tissue paper colors that coordinate with your cuff.
Lay the tissue paper beneath the cardstock strip and trim it so:
It is the same width as the cuff
It does not cover the lacing holes (if you added them)
You can use:
One layer of tissue paper for a simpler look
Two layers for a fuller, more dramatic effect

Step 8: Cut the Tissue Paper into Fringe
Leave an uncut band of tissue paper at the top (about 1–2 inches) so it can be attached to the cuff.
Cut vertical strips from the bottom upward, stopping before you reach the top band.
This is a fantastic scissor challenge for kids.
Encourage children to:
Cut straight lines
Cut wavy lines
Focus on experimentation rather than perfection


Step 9: Attach the Tissue Paper
Tape the uncut top band of tissue paper to the inside of the cardstock cuff.
The fringed strips should hang below the cuff.
For little kids:
Pre-cut small pieces of tape and place them on the table so they’re easy to grab.
This is the moment when the project suddenly becomes incredibly charming.


Step 10: Add any last minute embellishments
This is the last moment to easily add details to the cuff of our windsock. As soon as we close it things get trickier!
We decided to add a zigzag pattern with pink glitter glue. We placed one of our colorful hole punches at the top and bottom of each zag. So cute!


Step 11: Form the Windsock
Curve the cardstock into a cylinder.
If you are not adding lacing, secure the seam with tape and skip to Step 12.
If you are adding lacing, line up the punched holes and continue to the next step.

Step 12: Lace the Seam
Thread yarn or ribbon through the holes to close the cuff.
You can:
Tie knots
Add a bow
Leave decorative tails hanging down
For an easier experience, place a small piece of tape inside the seam first to hold the cylinder together while children lace. This is a great time to experience with different knots and lacing techniques!


Step 13: Add the Hanging String
Punch two holes near the top of the windsock on opposite sides.
Thread a piece of yarn, ribbon, or string through the holes and tie knots to secure it.
I placed my holes near the back so the laced seam becomes a delightful little detail you notice upon closer inspection.


Step 14: Hang Your Windsocks!
Take your windsock outside and hang it somewhere breezy. We hung ours up in a tree in our front yard.
Then sit back and watch the tissue paper dance in the wind.
It is absolutely magical.


The Best Part about this Windsock Craft? Using Wind as an Art Supply!
As art educators, we always have to be on the lookout for creative projects that help kids see MORE of the world. Windsock crafts do just this by helping kids notice air and wind.
Watching our windsocks float on tbe ocean breeze has become a relaxing nighttime activity in my home. They are so dreamy!
I wonder what art project we can work on next?


Did you enjoy this DIY Windsock Craft for Kids? You Might Like These Too!:
Or just Browse all my Tissue Paper Art Projects for Kids!
FAQ
What age is this windsock craft for kids best suited for?
This windsock craft is wonderful for kids ages 3 and up. Younger children can enjoy coloring and taping tissue paper, while older kids can experiment with gradients, lacing, and decorative details.
What materials do I need to make a windsock craft for kids?
You’ll need cardstock, tissue paper, scissors, tape, yarn or ribbon, and coloring supplies such as crayons, markers, or paint sticks. Optional supplies include a hole punch and glitter glue.
Can preschoolers make this windsock craft?
Yes! Preschoolers can absolutely make a simplified version. Skip the lacing and let them focus on coloring, cutting tissue paper, and watching their windsock dance in the wind.
Is this windsock craft a good summer activity for kids?
Definitely. This is a perfect summer craft because kids can hang their finished windsocks outdoors and explore how wind becomes part of the artwork.
Can I make this windsock craft without paint?
Yes. This project can be nearly mess-free. Use crayons, markers, colored pencils, or tissue paper collage instead of paint.
What do kids learn from making a windsock craft?
Kids practice color theory, scissor skills, visual estimation, lacing, knot tying, and creative problem solving. They also discover how air and movement can become part of an artwork.